Using Animations
Animations allow you to switch between different images to make a more visually dynamic entity on the screen. SplashKit allows you to create animations and use these together with sprite sheets to create these animations. Written by Tutorials on May 29 2018
Animations are a great way to help create more dynamic elements on the screen. These use a combination of a script and a sprite sheet (an image that is divided into separate cells where each cell is the same size and part of the animation.
Animations
You can think of animations in SplashKit are similar to a flip book, each image in the flip book is displayed for a short amount of time before the next image is displayed. The terminology in SplashKit defines animations in terms of frames, like the frames of a film strip. Frames are setup in an animation script, where they are linked together to define how animations created from the script work. Each frame indicates the part of the image it relates to, the amount of time it appears for, and which frame should follow it when the animation is played.
Animation scripts are not linked to a particular image, that is, an animation script can be applied to any number of bitmaps. This means it’s possible to write an animation to make a character walk and apply it to all your characters in a game, as long as all of those images are setup in the same way. SplashKit also includes code to help simplify animations when used with a sprite, however you can create and play an animation without using a sprite by interacting with the animation directly, a full list of functions and procedures can be found in the API.
This article focuses on the creation and use of animations without using sprites.
Animation Frames and Image Cells
As mentioned above, frames are used to control the speed and order of the images in an animation. At the same time, sprite sheet images contain a number of cells. The animation script links frames to cells, enabling you to reuse parts of the image (cells) in multiple ways within your animations. For example you could include a sprite sheet for a character walking and use this with an animation to walk forward and a second to walk back.
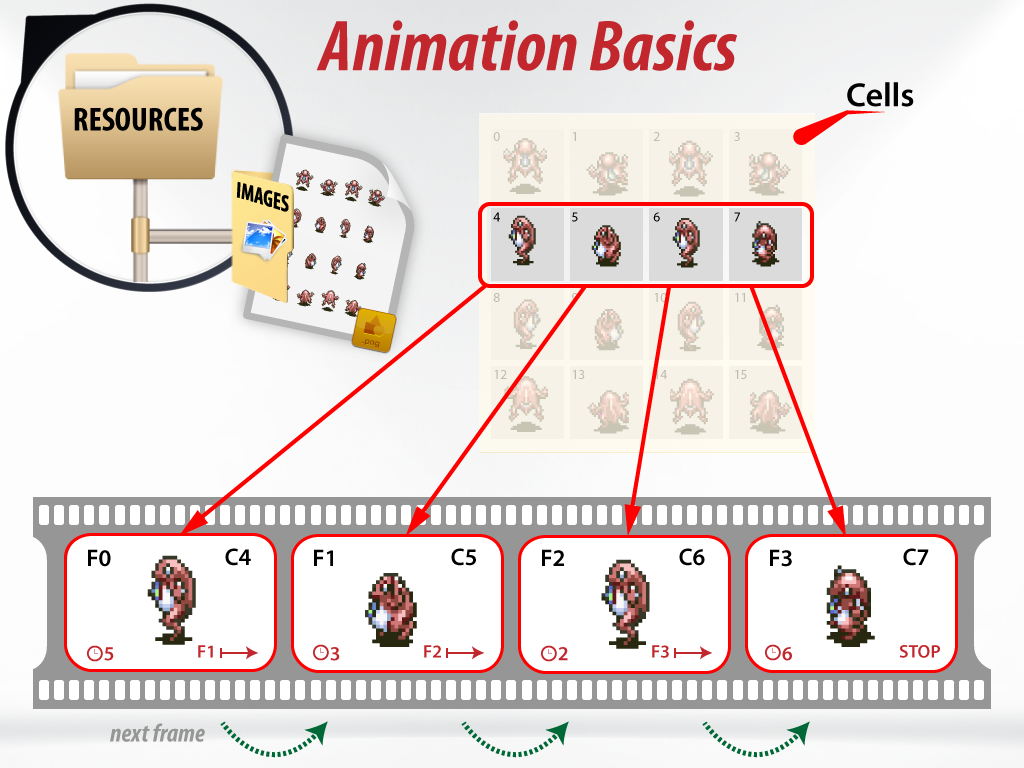
Cells are part of a bitmap image and are defined when the image is loaded (either through a bundle or in your code). When an image is loaded you can setup the cell details to indicate the width and height of the cells, the number of columns and rows, and the total number of cells (which may be fewer than the number of columns x rows).
The cells within an image are accessed by index, with each cell being numbered from the top left to bottom right (starting at 0). These indexes are used in frames to tell SplashKit what to draw to screen during the duration of the frame.
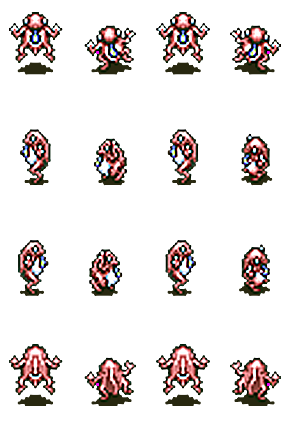
The above frog image gives you an example of a sprite sheet. As you can see this one image is actually a series of smaller images, these smaller images are what we call cells. For example, the first row show the character walking towards the viewer, while the last row show the character walking away from the viewer. To make an animation we need to link these images together in a meaningful way, this is done using an animation script.
Animation Frames
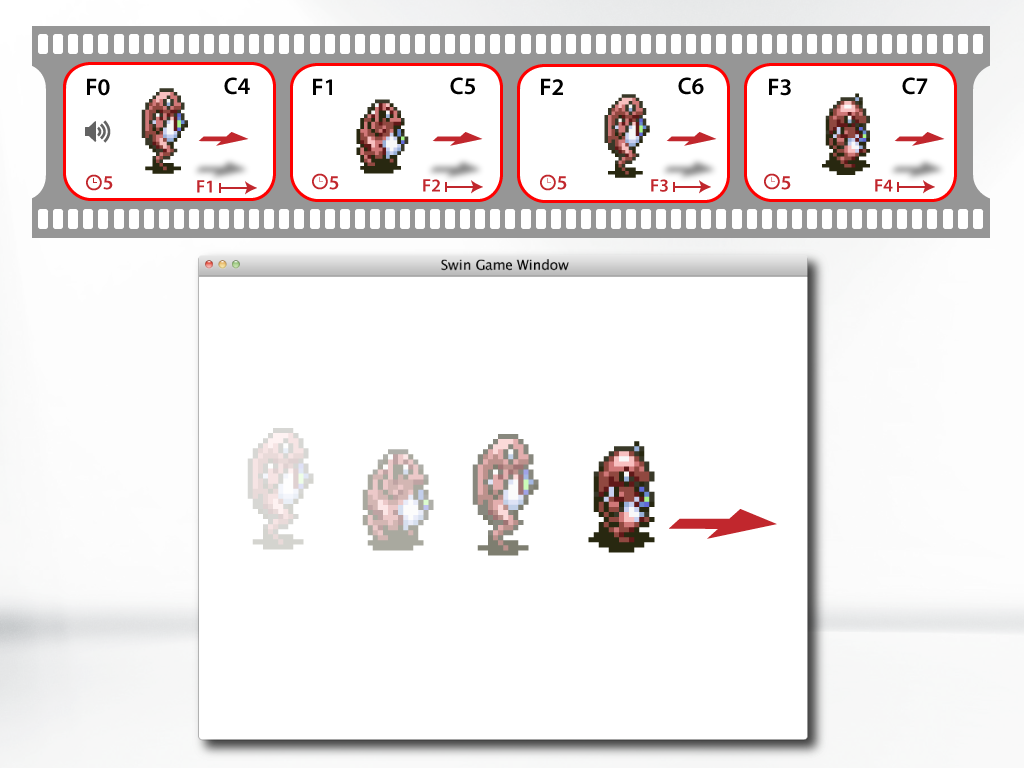
Within SplashKit, each frame have an identifier, cell number, duration, and a link to the next frame. They are incredibly powerful and can be linked together in any order to create different animations from the same images.
The identifier of a frame is used by SplashKit to connect frames together into a sequence. The cell number is used by SplashKit to get the part of the image to draw when the animation is playing that frame. The duration is the number of times the animation needs to be updated before the next frame will be played. The next frame is the index of the frame to move to once this frame completes. If this field is omitted then the animation ends after the current frame has finished.
Animation Scripts
Animation script details are coded into a text file in the animations subfolder of a SplashKit project’s resources folder. The format of this document starts with the text SplashKit Animation and is then followed by the definition of the frames defined within that script. The file has a basic line based format, so each line can be used to define one aspect of the script.
Frames are coded within the animation script file using a line that starts with ”f:”. The frame definition records the id of the frame, the cell to draw for that frame, its duration as a number of times to be updated, and the id of the frame that will follow this frame.
The following code is the start of an animation script file.
SplashKit Animation
//Frames are declared with an f: and contain//the following comma separated values//ID,CELL,DUR,NEXT////ID   - the frame index number//       this can be a range defined using [0-3] or [0,1,2,3] for example//CELL - the cell of the bitmap to draw//       this can be a range defined using [0-3] or [0,1,2,3] for example//DUR  - the number of times the frame need to be updated before moving to the next frame//NEXT - the index of the frame that follows the current frame
//f: identifier, cell number, duration, next frame)f: 0, 4, 5, 1f: 1, 5, 5, 2f: 2, 6, 5, 3f: 3, 7, 5,
//It can also be written using set-notation, as in the following example:f: [4-7], [4-7], 5,// orf: [8, 9, 10, 11], [8, 9, 10, 11], 5,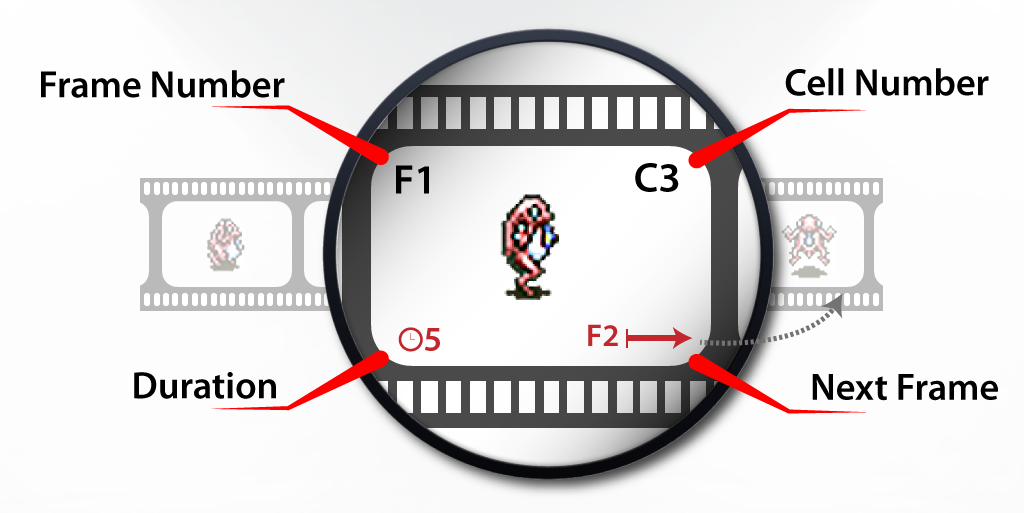
When designing your animation an easy place to start is with a frame per cell in your animation. You can then put in a set duration, and link the frames together. For example, with the Frog sprite sheet you could use the following as a start. This includes frames in four groups, one for each of the different animations within the sheet (as indicated by the comments). Notice that each of these is a loop, so the “toward the user” sequence plays cells 0, 1, 2, 3 and then back to 0.
SplashKit Animation
// Toward userf: [0-3], [0-3], 5, 0// To the leftf: [4-7], [4-7], 5, 4// To the rightf: [8-11], [8-11], 5, 8// Away from the userf: [12-15], [12-15], 5, 12
A Starting Point
The next key element of the Animation is a starting point. This is a named frame that signifies the start of an animation sequence. It is coded in the file using a line starting with ”i:” followed by the name of the animation (its identifier) and then the starting frame.
Using the frog animation we have the 4 separate animations, which can then be coded as 4 identifiers for walk forward starting at frame 0 (the loop 0, 1, 2, 3, 0, …), walk left starting at frame 4, walk right starting at frame 8, and walk away starting at frame 12.
SplashKit Animation
// -- Frames --// Toward userf: [0-3], [0-3], 5, 0// To the leftf: [4-7], [4-7], 5, 4// To the rightf: [8-11], [8-11], 5, 8// Away from the userf: [12-15], [12-15], 5, 12
// -- Animation Identifiers --i:walk forward,0i:walk left,4i:walk right,8i:walk away,12
Getting it Working
Once you have a sprite sheet and an animation script the code to get this working is relatively straight forward. What you need to do is:
-
Load the image and set its details:
- You can do this with a bundle by specifying the image and its details on one line.
- To load the image manually, you need to:
- Call Load Bitmap to load the sprite sheet.
- Call Bitmap Set Cell Details to set the cell details (which includes width, height, columns, rows, count).
-
Load the animation script using Load Animation Script.
-
Create an animation from the animation script using the identifier from the script. See Create Animation.
-
Create a Drawing Option using Option With Animation, which can be used to pass options to a draw bitmap call.
-
Draw the bitmap, passing in the image, the location to draw it, and the drawing options. See Draw Bitmap (using an Image) or Draw Bitmap (using the image name).
-
Update the animation using Update Animation.
This is demonstrated in the following code examples.
#include "splashkit.h"
/// A Test application to demonstrate the use of Animations in SplashKit.int main(){window w = open_window("Animation Test", 120, 120);
// We could load all of the resources in a bundle // load_resource_bundle("dance bundle", "dance_bundle.txt"); // // Then access by name // animation_script dance_script = animation_script_named("WalkingScript"); // bitmap frog = bitmap_named("FrogBmp");
// Loading them separately
// Load image and set its cell details bitmap frog = load_bitmap("FrogBmp", "Frog.png"); bitmap_set_cell_details(frog, 73, 105, 4, 4, 16); // cell width, height, cols, rows, count
// Load the animation script animation_script dance_script = load_animation_script("WalkingScript", "kermit.txt");
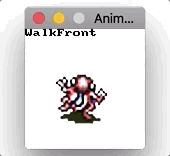
// Create the animation animation test = create_animation(dance_script, "WalkFront");
// Create a drawing option drawing_options opt; opt = option_with_animation(test);
// Basic event loop while( not quit_requested() ) { // Draw the bitmap - using opt to link to animation clear_screen(COLOR_WHITE); draw_bitmap(frog, 20, 20, opt); refresh_screen(60);
// Update the animation update_animation(test);
process_events();
// Switch animations if ( key_typed(UP_KEY)) { assign_animation(test, "WalkBack"); } else if ( key_typed(DOWN_KEY)) { assign_animation(test, "WalkFront"); } else if ( key_typed(D_KEY)) { assign_animation(test, "Dance"); } }
}using System;using SplashKitSDK;
public class Program{ /// <summary> /// A Test application to demonstrate the use of Animations in SplashKit. /// </summary> public static void Main() { Window w = new Window("Animation Test", 120, 120);
// We could load all of the resources in a bundle // SplashKit.LoadResourceBundle("dance bundle", "dance_bundle.txt"); // // Then access by name // AnimationScript danceScript = SplashKit.AnimationScriptNamed("WalkingScript"); // Bitmap frog = SplashKit.BitmapNamed("FrogBmp");
// Loading them separately
// Load image and set its cell details Bitmap frog = SplashKit.LoadBitmap("FrogBmp","Frog.png"); frog.SetCellDetails(73, 105, 4, 4, 16); // cell width, height, cols, rows, count
// Load the animation script AnimationScript danceScript = SplashKit.LoadAnimationScript("WalkingScript", "kermit.txt");
// Create the animation Animation test = danceScript.CreateAnimation("WalkFront");
// Create a drawing option DrawingOptions opt; opt = SplashKit.OptionWithAnimation(test);
// Basic event loop while(! w.CloseRequested) { // Draw the bitmap - using opt to link to animation w.Clear(Color.White); w.DrawBitmap(frog, 20, 20, opt); w.Refresh(60);
// Update the animation test.Update();
SplashKit.ProcessEvents();
// Switch animations if ( SplashKit.KeyTyped(KeyCode.UpKey)) { test.Assign("WalkBack"); } else if ( SplashKit.KeyTyped(KeyCode.DownKey)) { test.Assign("WalkFront"); } else if ( SplashKit.KeyTyped(KeyCode.DKey)) { test.Assign("Dance"); } } }}To test the above code you can download these resources. This includes sample animation scripts, images, and sounds.
Other Options
Switching Animations
Once you have an Animation you can use the Assign Animation method to switch from one animation sequence to another in the same animation script, or to swap to alternate animation scripts.
When calling assign animation, you indicate the animation to change and the new animation details, which include the animation identifier and optionally a new animation script.
Adding Sounds
Animations can include points where sounds should be played as well. When sound is played in an animation it is played as soon as the frame starts playing and only plays once for that frames duration. SplashKit will manage the loading of the sound for you (like it does in a bundle).
Sounds are coded with lines starting with ”s:”. An example of this is written below, it plays footsteps.wav whenever the frame with the identifier 0 is played.
//s: Identifier, SoundName, Filenames: 0, 'FootStep', 'footsteps.wav'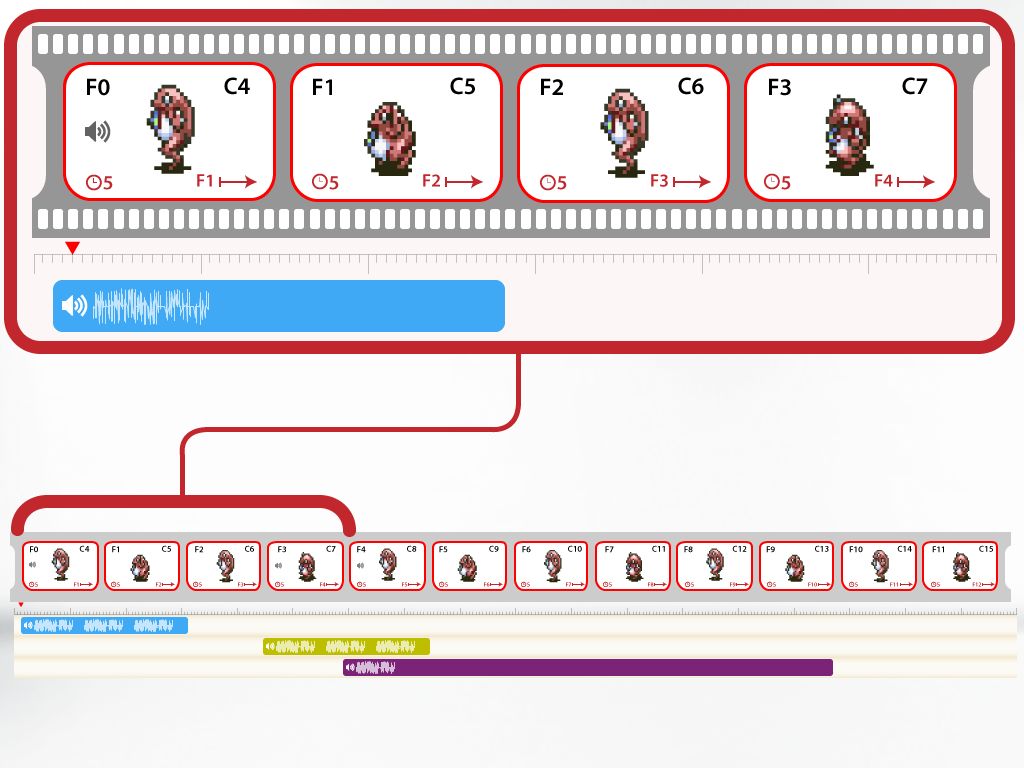
Including Movement
SplashKit animations also includes options to add vectors to individual frames, which are automatically applied when these animations are used in conjuncture with Sprites. This will allow you to apply a velocity vector to sprites when they’re updated. This vector is applied to the current position of the sprite, it is applied every UpdateSprite call, and can be applied manually to an animation. Vectors can be applied to a set of frames using set notation ([low - high]).
In the animation script, a vector is indicated using a line starting with ”v:”. The following animation script snippet will move the sprite +5 pixels in the x axis and -3 pixels along the y axis for every Sprite Update while the animation is on the 0 frame.
//v: identifier, change in x velocity, change in y velocityv: 0, 5, -3